

Introduction to the WDS Napoleonic Battles series - Third Installment

Greetings,
Welcome to the third installment in our series focused on the Napoleonic Battles games. We will follow the same presentation format set forth in the first two installments. If you haven't read those you can do so here and here.
We have setup a thread on the forum where this article can be discussed if you are so inclined. The comments section at the bottom doesn't allow interaction and easy response... you can visit that thread here. You do not have to be registered to read - only to post.
Note: All images can be clicked for a full sized view.
So let's get going with the next installment!
Advanced Training


Defensive actions can be difficult to handle, as being on the defensive often means being outnumbered and/or outgunned. This is a problem on its own which can be aggravated further by two common mistakes.
The first one is crowding the defensive line with all available forces to maximize firepower and melee odds. Consequently, some players find that a significant part of their army is routed after just a few turns (assuming historical choice of optional rule settings with Rout Limiting disabled). While there's always a slim probability of an unfortunate series of die rolls where units consistently take and fail morale checks, statistically, the chances of such an unlucky sequence are extremely slim. It is most likely the reasoning for such massive routing is in the faulty deployment rather than an act of an evil spirit or “unrealistic” game mechanics. While luck most likely favors large battalions, these have to be deployed properly in the first place.
The second mistake involves leaving gaps within the defensive line, offering the attacking side opportunities to exploit these openings by flanking, isolating, and penetrating further to the rear, disrupting the defensive setup. This oversight is quite common, especially among less experienced players.
The following section covers the defense in depth concept which aims to address the defense challenge and provide players with a tactical doctrine for an infantry divisions defensive deployment. While it’s good to have the theory, keep in mind that in practice battlefield deployment will be complicated by various aspects like terrain, your own and enemy force composition, timing, weather, fog of war, command and control disruptions, etc. So, there is never a guaranteed recipe for success. That’s the nature of unpredictability in warfare very well mirrored in the WDS Napoleonic series. However, systematic execution of superior tactical doctrines will eventually pay off.
Infantry Division deployment in defense
The optimal in-depth defense is where divisions are deployed into three echelons:
- Forward Line (FL)
- Main Resistance Line (MRL)
- Reserve Line (RL)
The following image shows a Russian infantry division from the 1812 Campaign deployed in depth.
Note the 800 meter frontage of the MRL for a division consisting of 12 battalions. This is a rough but critical benchmark for in-depth defense. The formula is to be kept into consideration when assessing a frontage to be defended: 1 hex requires 1.5 battalions for defense in depth. Hence a division of 8 battalions would ideally cover only 5 hexes. Any deployment below this standard is not likely to hold in case of the determined assault so the critical points of the line should always adhere to this standard. If there are not enough troops to form such density it is strongly recommended to seek another defensive line with shorter frontage.
Pay attention to the continuous Zone of Control (ZOC) line at the MRL. There are no gaps to exploit and if such gaps occur due to enemy action then every attempt should be made to restore the integrity of the line.
While it is important to aim for in depth positioning to secure the front one has to keep an eye for the flanks. Seek for defensive positions which have flanks covered by friendly forces, obstructed or impassable terrain: edges of the map, water hexes, creeks, swamps or at least woods, villages or high ground covered by streams. The in-depth position may stop the attackers frontally but if the flanks can be easily exploited the defensive line will crumble. Difficult terrain swarmed with skirmishes should demotivate the attacker from even attempting to outflank you.
(RH) I personally consider it poor form to use the map edge to secure your line, in all but the smallest scenarios (No offense Alex!). There is no map edge in reality - if you aren't in a good spot where you are, relocate and find another.

Pay attention to the two hexes space between FL > MLR > Reserve Line. In case any unit is pushed back by melee and routed, the fleeing troops will not spread the panic to the next line. This is the critical aspect for in depth positioning and mirrors the historical deployment already discussed in the section on Optional rules, in particular Rout Limiting.
The choice of battalions for each line could be the following:
- FL: light infantry in skirmish order and formed light infantry of quality B up to 200 headcounts in square/line formation. Their role is to delay, disrupt and to shield the MRL forcing the enemy to maneuver “under the guns” from your MRL.
- MRL: large line infantry battalions of no less than C quality.
- RL: battalions of D quality (and below) quality cannot be expected to hold MRL, but in melee and musket FP they are just as good as any other battalion hence these should be kept in RL in column formation ready to counterattack.
(RH) Something that may not be clear to someone who doesn't play this system often is the effect of Zones of Control or ZOC. In the marked up image below I have placed two blue arrows depicting French cavalry charges through the deployment. The one to the left is able to overrun the Russian skirmish unit and proceed to confront the MRL. It is stopped before that stack however, as it is now in one of the two forward facing hexes that comprise the ZOC exerted by those units. The green rectangles represent each stacks ZOC - which forms a solid line.
So the attacking unit(s) have been halted at the MRL this round and may, or may not choose to initiate melee. On the subsequent turn the defender must adjust their forces though, either moving the line back a hex, or bringing up reserves. If they do not then the attacking stack is able to move through the gap and towards their RL.
The second blue arrow is another French charge, but this time we assume the center Russian unit has formed Square. When it does that a ZOC is exerted into all 6 surrounding hexes, and so the charge must stop when it gets adjacent. The down side for the defenders is threefold however. They now can only present a 25% fire effectiveness from each side of the square, they can only move a single hex at a time and they are also more vulnerable to artillery & musket fire.

Let’s look at each line in detail.
Forward Line (FL)
Location: two hexes ahead of the MRL.
It is recommended to use light battalions where possible to create a FL. Once the light companies are detached and assigned their positions, the parent battalions of below 200 men can be used to form a FL. The light battalions are often quality B which makes them perfect outfits to deploy in the FL for number of reasons:
- They will not rout easily.
- They project ZOC as any other formed unit.
- They do not have significant combat value being only 100-200 in terms unit size and their loss will not hamper overall combat readiness of the division.
- They do not represent many VPs so there are not too many VPs to lose.
(RH) As of 4.07 Light & Guard units are now able to break completely down into skirmish companies, so you don't have to have a remaining formed unit as the parent. Multiple benefits here and the companies can still recombine as needed. This can potentially reduce the beating a parent unit would take when deployed forward like in this example.
The purpose of the FL is not to stop but:
- To delay the enemy.
- To disorganize the enemy main attack plan.
- To expose the main attacking body to the fire power (FP) from my MLR artillery forcing the enemy to storm the FL under canister fire.
- To block enemy cavalry via forming squares (provided >100 headcount).
- To force the enemy to deploy their artillery batteries at the greater distance from my MLR.
A good historical example would be at the battle of Borodino a light brigade of the 27th infantry division was positioned in front of the fletches. Historically, the French could not attack fletches until they cleared the FL of the Russian position and this is the first obstacle a French player is facing while attempting to storm Russian left flank in Borodino scenario from Napoleon’s Russian Campaign.
Another alternative to the deployment shown in the image is to form squares preventively to create a continuous ZOC in front of the FL. In this case the squares should have a leader stacked with them to lower the probability of routing.
In a real Play-By-Email (PBEM) scenario, maintaining a parade-like formation in depth would prove to be quite challenging. Here's an example from a PBEM campaign set in 1807:

The Russian FL is made of two squares one hex ahead of MRL. However, there is no continuous ZOC in between as the square in the center was routed creating a gap in the FL. Also, the FL is no longer two hexes ahead of MRL as squares were already assaulted and pushed one hex back.
To rectify the situation, the Russian commander committed two cavalry regiments to a charge from the rear of the RL, to provide support for the FL and reestablish an unbroken ZOC line.
The first row of the French attacking body was already in a bad shape due to disorder from melee against the FL and canister fire from MRL earthworks as the French had to assault the FL under artillery fire. Also, the French were attacking in one body, rather than in waves (this is discussed in detail in the next chapter), so their units are stacked next to each other making them vulnerable to a panic spreading and disorder.
The cavalry charge was a success, and two French battalions were routed spreading disorder and routing to numerous French units behind them. Note, the squadron of Russian dragoons (cavalry unit with D letter on it) ahead of the FL. This one was sent one hex forward in “continue charging” mode to create ZOC ahead and shield the rest of the regiment and the nearby square from the enemy counterattack. This tactic was covered in the previous blog post on cavalry tactics. Consequently, the French player had to call off the attack due to broken formation and disorder in the ranks.
In this action:
- FL did its job in holding the enemy and forcing them to assault the line under the canister fire from MRL
- MRL provided the fire support to FL
- RL was represented by the victorious dragoons and hussars charging the disordered French units from the depth of the position.
Critical thing to watch while deploying skirmish companies in the FL (or on the offensive for that matter): do not expose your skirmishes to enemy cavalry, especially if you have lightly protected batteries at the rear. Example in first image below: The French player deployed a skirmish company two hexes ahead of the 7-gun battery, which was also without formed infantry protection (only one skirmish company in the hex).


The following turn, a previously unspotted squadron of 145 hussars approached the French skirmishes (yellow arrow) using the Charge function and stopped in front of the company but NOT overrunning them. In the melee phase the skirmishes were meleed and pushed aside opening a route towards the battery in the “continue charging” mode (purple arrow). The melee phase ended (the second image) with the French battery being eliminated by hussars. Only a few dozen of which survived the charge but eliminating a key artillery position in this sector. In conclusion, watch the space between your skirmishes in the FL and your guns at the rear and protect the guns with formed battalions at all times.
(RH) If playing with Turns and the embedded Melee phase the cavalry squadron would have charged the whole distance and overrun the skirmishers - completely eliminating them - ending the charge movement in front of the artillery battery (based on the number of hexes that had to be covered). In the melee phase they could then attack the battery and eliminate it.
Outside of the elimination of the skirmishers the difference would be the fire they took. In phases the defending player would get to fire volleys with both the target battery, and likely the one to its right as well - and possibly others not pictured. In Turns opportunity fire would occur while the charge was being conducted, and a final fire would likely be triggered when the melee was initiated.
Main Resistance Line
As the name suggests this is where we aim to break the attack and this is where we concentrate most of our FP deploying the divisional artillery. In case of 8- or 12-gun batteries it may be worth to go into extended line (as per the image) and keep only 4 or 6 guns in each defended hex. In case of a lost melee the damage is less significant. Still, having artillery in the MLR is risky. There is a safer option to deploy the artillery further to the rear along with battalions of the RL compromising the FP of MRL.
The larger line battalions are the best to be deployed in the hexes with batteries of the MRL to maximize the density of the hex and to improve our odds in case of melee. To boost the numbers further it is suggested to pack MRL with 1-2 companies of light infantry as it gives more numbers for the purpose of melee and making it costly and risker for the attacker. Skirmishes also add some FP to the MLR. This is what the image is showing with 6-gun battery + 450 formed battalion + 58 jagers.
(RH) Worth noting that in the image above the skirmish company would be "masked" behind the battery and the formed infantry in Line. So while they would defend in melee in this arrangement, in order for them to be able to fire they need to be placed "On top" of the stack.
A further comment as well - I generally play with the Flank Morale Modifier rule selected as well as the Target Density & Column Pass Through Fire rules. Couple this with the revised Stacking rules in 4.07.1 and I feel you are better served in spreading your forces out, a bit. Still in depth, but instead of 3 strong stacks I would have a frontage of say 5 battalions deployed in Line, in adjacent hexes. My artillery would be deployed to the rear - preferably on a higher elevation - but if on the same level I can create gaps in the line to allow fire lanes to be used. This allows me to bring the most muskets to bear at one time on any attacking forces. But, as in the larger discussion, reserves are imperative.
Reserve Line
To be placed 2-3 hexes behind the MRL. These units are to rotate disordered and fatigued battalions of the MRL. There is also a counterattacking task force to be formed made of 2-3 battalions in column formation. I tend to keep a battalion or two of the RL in line formation to add some FP to the counterattack or ready to rotate units from MLR.
To benefit from combined arms doctrine, it is best to position a cavalry regiment behind and shielded by RL infantry battalions. The cavalry would be unspotted and can be sent into a sudden charge while RL’s battalions in line formation close in to deliver the volley prior. Prussian brigades typically containing a cavalry regiment have the optimal organization for such action.
(RH) Always keep your units in the command radius of their immediate superior as well. Very demoralizing to think you have a ready reserve only to find them unable to initiate melee due to being Detached, or not returning to good order as they can't pass their morale checks.
It is also advisable to keep your RL out of LOS of your enemy, when possible. Think "Reverse Slope" - might take them an extra hex or two of moving to come to the aid of their fellow troops - but it can also help them avoid long range disruptive bombardments that can add fatigue and crush morale.
Position assessment
The necessity to position in depth has implications beyond tactical aspects. Being unable to deploy divisions in depth should raise a question whether the overall position can be defended in the first place. Let’s look at an example from the Marengo Campaign where an Austrian army is positioned on the defense.

(the divisional icons [braces] are mapped at scale to the optimal front for in depth deployment)
Although the individual strong points may seem formidable with both flanks secured by terrain and with earthworks and the stream/creek in front, the position is divided into several sectors with considerable distances between them, separated by challenging terrain. This makes it difficult to coordinate the defense moving of reserves from one sector to another in time.
- Sector 1 is quite isolated as any Austrian reserves dispatched to the area would be restricted in maneuver due to terrain. The earthworks in sector 1 can also be easily outflanked. Furthermore, in case Sector 2 is broken, the Austrian units in sector 1 would be cut off from the main army with only one narrow path leading into the rear. Finally, the Austrian division positioned in this area is lacking skirmishes needed to operate in this area effectively.
- Sector 2 has the low ground in front of it limiting LOS and the earthworks’ left flank is exposed. Any reinforcements within the sector have to maneuver via fields and hedges.
- Sector 3 has a good LOS, however it is overextended with no roads in its rear but with fields and elevations, so reinforcing the area is a problem too.
- Sector 4 has a pike road which makes it very juicy sector for the enemy to assault: easier to concentrate, easier to rotate disordered units and in case of breakthrough the advance into the Austrian rear would be at double speed.
Above all, the allied position is too extended for the current force available (35 inf battalions), spanning 40 hexes and potentially even longer if the French attempt to outflank the exposed right flank around sector 4.
With only 35 infantry battalions available, it is not feasible to secure the entire front effectively. Such frontage would require approximately 60 battalions for in-depth deployment (40 hexes*1.5 battalions per hex). Consequently, the conclusion is that the position should be abandoned.
By turn three, it also became apparent that the Austrian army is outnumbered and outgunned by French 8-lb batteries. The Austrian player made a decision to abandon the position and pull back. The three turns delay in this decision cost the Austrians about 10% of their army lost in rearguard actions (described in the next chapter). Attempting to hold the position would probably result in a loss of most of the army. By making the timely decision the main force made it off the map to continue the campaign and to fight another day. No artillery or wagons were lost in the process. The decision to abandon the position was barely made in time. Any further delay would be turning the retreat into disaster.


Offensive warfare is a tough nut to crack, but it's also where the real fun begins if you know how to play your cards right. In this chapter, we're diving deep into the essentials of offensive gameplay, putting offensive tactics under the historical spotlight of Napoleonic warfare and doing some after action analysis from PBEM. Let's break it all down and uncover the core components that make offensive wargaming both a test and a thrill.
6.1 formation by Echelons
It's quite common for players to assemble their regiments and brigades into a single large body, essentially stacking waves of attacking units’ side by side without any gaps. Below is an example from a PBEM rearguard action to illustrate this:

(RH) The above image uses the Tab key to toggle the unit strength display on the map. Hit Tab again to turn it off.
The French units advanced in a stacked formation toward a few Russian batteries. The Russian batteries distributed their offensive fire across three separate French units, maximizing the potential for multiple morale checks. Although directing their fire at the leading French battalion (the closest target) could have caused more French losses, however Napoleonic warfare was about breaking enemy morale and formations rather than annihilating the enemy. In line with this historical reality, the game favors targeting three separate units with lower Firepower (FP) over concentrating all (or even higher) FP on one unit. This fire discipline increases the chances of triggering multiple morale checks during offensive fire and determined by the morale check formula outlined in the manual.
Regrettably, there were no prisoners to report, making it challenging to determine which specific battalions failed the morale check. Nevertheless, adjacent battalions were also subjected to morale checks, resulting in them either joining their comrades in routing or becoming disordered:

The result of the French assault was a massive rout, with the remaining units becoming combat ineffective due to disorder. None of the French units exposed to the fire had leaders within their stacks, which worsened the routing situation.
In this specific case, the rearguard action was constrained in time. The failed assault essentially determined the battle's outcome, as there was no time for the French to regroup and attempt a second assault.
Arguably, the aftermath of this assault significantly impacted the broader campaign dynamics. The Russian major victory in this rearguard action potentially had a domino effect, influencing a subsequent decisive battle scenario and forcing the French into an unfavorable position with limited options for maneuvering.
Nonetheless, there are rare situations where forming attacking units into a large body can be justified.
The most obvious advantage of this formation is the increased threat value it poses. This can lead to causing disorder or even routing among defenders of lesser disciplined units, particularly those below C quality. However, the argument of maximizing threat value might hold true only when the enemy is badly outnumbered and isn't expected to launch a strong counterattack and lacks the required Firepower (FP) to trigger multiple morale checks. These situations mostly fall under reargued actions. The enemy units increase the distance from the main attacking body and as they move it decreases FP by -50% due to movement penalty (if they conduct offensive fire).
(RH) You can read more on Threat Values in section 5.2.20 of the User Manual.
Being in closer proximity to the enemy also allows for melee threats against their battle lines using multiple units. However, in most cases, the risk of a mass rout and disorder, turning the advancing formation into a mob, outweighs the benefits of the threat and having multiple stacks ready for assault.
Using a dense formation can be justified if the attacking force's first line is composed of high-quality units, like Quality B, all stacked with leaders or Quality A and above units that typically won't retreat from a lost melee or losses from a ranged fire.
In all other scenarios, an advance by echelon is highly recommended. Let’s look at the screenshot below with a combined arms force, comprising an infantry and a cavalry division arranged into two attacking echelons:

- First Echelon: A mix of cavalry and infantry, presenting a combined arms threat to the enemy line.
- Skirmish Companies within the first Echelon: Their role is twofold—boosting the stack with additional troops to deter enemy cavalry counterattacks and, in the event of melee, absorbing losses to spare formed battalions. Ideally, skirmish companies bear the brunt of melee losses, sparing the fatigue of formed battalions. Mathematically, this is a favorable outcome, as larger units remain relatively untouched by melee fatigue.*
- Second Echelon: Also combined arms formation, positioned two hexes behind the first echelon to take its place in case of disorder or enemy counterattack. The two-hex distance prevents chain routs and disorder.
- Second Echelon Deployment: Near maximizing stacking to prevent the first echelon from routing through it. Skirmish companies are used within infantry hexes to achieve near maximum stacking.
- Limbered Horse Artillery: Positioned in the second echelon, ready to move forward with the stack and provide fire support. Batteries are stacked with formed battalions and skirmish companies to achieve near maximum stacking.
- Concealed Foot Battery: Positioned in the center behind the second echelon, covering the entire formation frontage and prepared to offer canister support in the event of an enemy counterattack.
Of course, replicating such a parade-like formation is rare in actual game situations. However, a consistent effort can be made to adhere to these principles whenever possible.
* (RH) With 4.07 the following change has been made. Adjustment so that fatigue accumulation is 2-3 times the loss of men, which result in less variation in assignment. Previous values were 1-3 times.
6.2 Local FP superiority
Achieving local firepower superiority stands as a cornerstone of successful offensive tactics. This strategic principle emphasizes concentrating your forces at a specific point on the battlefield to overwhelm the enemy's defenses through sheer volume of firepower mirroring Napoleon’s use of grand batteries. Refer to the chapter on Artillery tactics (in the Second Installment post) for further details on the subject.
6.3 Spotting the Vulnerability
Begin by carefully inspecting the enemy line for weak points. Frequently, you'll find a spot where their defensive line bends or curves, presenting an opportunity for a flanking attack and enfilade fire. Your goal is to pinpoint this exact location. To illustrate, take a look at the deployment of the Russian army depicted on the right, showcasing a noticeable bend in their line.
At this specific point, defenders become susceptible to enfilade fire or might be compelled to expose a flank within a particular hex. If you're unable to identify such a weak spot initially, consider a maneuver to force the enemy into adjusting their defensive line. Once this bending is achieved, you'll establish an advantageous position that should become the point for your offensive efforts.

(RH) The psychological effect of having a significant cavalry force demonstrating on a defenders flank could be just the ticket to cause them to adjust their defensive position and expose themselves to your artillery followed by an infantry assault. Combined arms don't always have to be implemented within a tightly confined space in order to support each other. Never under estimate the psychological effect of maneuver and demonstration.
6.4 Axis of advance
When planning offensive (and likewise defensive) operations, one crucial element to consider is the mobility provided by roads, especially pikes, where movement costs are reduced. Attacking along these routes offers several advantages:
- Easier concentration of attacking echelons.
- Easier rotation of disordered units.
- Easier envelopment of retreating enemy units.
Avoid planning complex maneuver through obstructed terrain, as enemy reconnaissance is likely to detect such movements. The odds are that the enemy will counter with optimal movements through open terrain, rendering your efforts unproductive. Roads and, particularly, pikes have operational implications beyond tactical aspects, as illustrated in the following example from the 1813 Bautzen Campaign (***minor spoilers***):

The allied force is divided into two isolated columns: the Prussian column approaching from the northeast and the Russian column from the southeast. There are two white arrows indicating two possible routes to reach the key VP positioned in Sector 1 and 2 and further to the rear. These routes are the only possible axis of advance which offer the allies the ability to move out from the woods into the open, to deploy their formidable cavalry and artillery. Consequently, the battle is expected to revolve around the areas designated as Sector 1 and Sector 2. A substantial distance separates the two allied columns, covered with wooded terrain. It is estimated that it would take at least 20 turns to cover the distance on foot.
The French presumably start the scenario with a few dispersed and isolated divisions but with a steady flow of reinforcements. The significant advantage the French possess is the pike (marked in red) linking the Sector 1 and 2. The French player can shift reserves along the pike at double speed, taking a short direct route. This allows easy concentration of forces, creating a local advantage and beating back the allied column to the south, pushing them back into the woods and denying the Russian column the ability to deploy their powerful artillery. Then, the French player can shift focus to the north, reinforcing his outnumbered force in sector 1, covering the distance in only 3 turns.
The allied player does not stand a chance to shift his effort in the same manner. Any allied unit from one column moving to support the other column will have to follow a wide arc, taking at least 20 turns (for infantry) to arrive.
On a lower tactical level, always consider the road network when planning the place of your attack. When selecting your main effort location, prioritize terrain with a road running not only towards the enemy but also behind and parallel to your intended battle line. This facilitates maneuvering your reserves along the front.
Also, check if the enemy defensive line has a road running behind, in parallel to their main resistance line (MRL). In such a case, it would be difficult to catch the defender off guard, as reserves can be quickly shifted behind the battle line, plugging holes and mounting counterattacks. Below is the example of a well chosen defensive ground the attacker should be avoiding:

The Prussian force is being deployed behind a stream, providing excellent line of sight for Prussian artillery. The approaches to the Prussian position are covered with fields, limiting both cavalry and infantry to a movement of only 3 hexes per turn. Approaching the Prussian position under artillery bombardment and before any contact is made would take at least three turns. The stream negates the opportunity to use French cavalry to attack the Prussians. Furthermore, there are no roads behind the French position, only fields, making maneuvering and echelon rotations extremely difficult. On the other hand, the Prussians can position their forward line behind the stream, while their MRL and reserves can enjoy freedom of movement on the open ground, supplemented by the road running parallel to their battle line.
(RH) When he says "negating the opportunity to attack with the cavalry", what he means is they will Disorder when they cross the stream which effectively removes their charge bonus. They are able to cross however. Only a Creek or full water hex river would prevent them being used entirely.
6.5 Skirmishers
In 1807, on the eve of the Battle of Friedland, Marshal Lannes confronted the full might of the Russian army with a single corps. Employing a skillful delaying tactic, Lannes deployed a thick screen of skirmishers to hold the line, gradually yielding ground and disrupting the enemy's momentum. This historical feat resonates with WDS Napoleonic battlefields, where players often employ skirmish screens to similar effect.
When confronted with such a deployment, one effective response is to counter the enemy's skirmishers with your own cavalry. Yet, circumstances might not always permit this tactic due to terrain limitations or the presence of substantial enemy infantry and artillery behind the skirmish screen.
In such scenarios, consider engaging the enemy skirmishers in melee with your own. One on one company melee is the way to go. Even though this most likely will lead to your skirmishers losing the melee and the defender retaining control of the hex, it's a viable tactical choice. While losses might amount to only 1 or 2 men on each side, the enemy's disorder and potential routing can offset this negligible setback of losing a couple of soldiers in melee. Next turn, you can repeat the melee, rotating your skirmish companies and assaulting with fresh ones until the enemy skirmishes are routed or forced into retreat.
The defending side is less likely to rotate all disordered skirmishes companies, leaving them vulnerable to follow-up assaults. Should they choose not to rotate, disordered skirmishers will have diminished Firepower (FP), and disorder status making them more susceptible to routing in the subsequent turn. If rotation occurs, their offensive FP is further reduced by 50% due to movement penalty.
(RH) As of 4.07.1 Skirmishers will incur fatigue at the same rate as formed units. So tactics like the above will have slightly higher consequences. As with anything in (virtual) war, you have to weigh the cost and rewards...
When the enemy lacks a skirmish screen, your own skirmishers can adopt an aggressive stance. While friendly skirmishers typically have lower FP than infantry formed in line, they can be supported by cavalry using a combined arms approach. Threatened by a cavalry charge, the enemy will be likely forced to form squares, drastically reducing their FP to 25% of the line FP. On the other hand, your skirmishers targeting squares will gain 25% FP boost.
It makes sense to maximize your skirmish line to the maximum staking of 225 * skirmishes per hex for two reasons: to maximize the FP and to raise the stakes for the enemy cavalry in case they choose to charge and overrun your skirmish stacks. The cavalry will have to outnumber the skirmishes within the hex in order to overrun them.
(RH) * This value is PDT dependent and may vary from game to game and scenario to scenario. You can check the actual value for the scenario you are playing in the Parameter Data Dialog from the Help menu, or by pressing F2.
The screenshot below demonstrates the use of skirmishes in probing the Italian defenses:

Turn 1: The Italian infantry had to form squares due to the cavalry threat.
Turn 2: Two Russian battalions in skirmish formation approach the squares, unleashing lethal fire from around 1,000 skirmishers across 5 hexes, establishing local FP superiority over the Italian squares.
Turn 3: The French player does not have any good choice out of the situation. He commits a light cavalry regiment, (being his only combat ready cavalry reserve in the sector), into the charge overrunning one stack of the skirmishes out of five. The cavalry charge is supported by an infantry column attacking another skirmish stack. The damage was substantial with close to 200 Russian skirmishes cut down by Italian chasseurs, two companies routed and one more disordered.
Turn 4: However, the Italian formation is now vulnerable to a counterattack due to its consolidation into a single formation without any gaps between echelons. The Russian main body made up of a cavalry regiment, along with two large infantry battalions initiated the attack, resulting in the Italian cavalry pushed by melee into a hex held by Italian infantry, mixing up the formations causing disorder and routing.
The final outcome of the action resulted in the Italian line becoming disordered and routed incurring heavy losses. This routing had a cascading effect, disrupting the second echelon of Italian infantry and leading to a general retreat. In the subsequent turn, the Italian units in the sector were in a compromised state, with a majority of them disordered and pulling back to safety behind the stream.
The Russian assault, driven by an initial probe of skirmishes, proved to be the first step in an attempt to disrupt the Italian defense line. Losses in this sector were approximately ~350 infantry and ~20 cavalry for the Russian force, compared to ~500 infantry and ~40 cavalry for the Italians. The position was won by a combined arms approach, with skirmishes playing a key role spearheading the assault. Their involvement not only lured out the enemy reserves but also compromised the integrity of the Italian defensive line.
Cavalry is not always available to force the enemy into forming squares so enemy infantry is likely to be formed in line. In such cases, an infiltration tactic can prove effective. This involves advancing between the intervals of the enemy's line infantry, positioning skirmishes for an enfilade firing position on the enemy infantry formations arranged in line. The defending side cannot afford to ignore this tactic. They are compelled to make a choice: either withdraw a hex back to maintain the enemy skirmishes in front, or counterattack with reserves and potentially giving up the intervals between the units making the whole formation prone to mass routing.
To summarize, skirmishes introduce a wealth of tactical flexibility on the offensive:
- To probe enemy positions, compelling them to react and to break their line.
- To repel opposing skirmishers and gain advantageous positions.
- To gain local FP superiority over enemy columns and squares (do not count on winning a fire fight vs infantry formed in line).
6.6 Combined arms
As demonstrated in many previous chapters, combined arms focus is the essential element of the tactical art. This short section is largely focused on a general theory and is pretty much drawn from an old but still valid post from Napoleonic Wargame Club (NWC) forum. The post was made by a veteran NWC member so it is shown here almost as a direct quote with only minor amendments. (Explore various clubs that play WDS games here.)
"Terrain driver dictates the tactical mix over which you will fight. For example, a wooded area has no need for cavalry and limited need for artillery. An effective combined arms attack or defense hinges on appropriate terrain for free cavalry use and effective artillery positions. Essentially if you can see an area that would offer great artillery positions and allow your cavalry to fight freely you have found a combined arms hotspot.
In essence combined arms is all about making sure that each of your arms bears the load of the tactical battle in a local area. Ideally a hotspot allows your guns to work well with your other forces and your cavalry to roam freely charging and reforming in waves as appropriate.
However, before plunging forward and seizing the hotspot you have identified you need to do some planning. You need to define your force mix and battle groups. Napoleon always did this often-interchanging units from corps to corps as appropriate. Your combined arms forces may take differing shapes depending on the specific situation. Perhaps you need some heavy batteries from the army artillery reserve to outgun the opposing artillery in this sector. Or maybe the local infantry division lacking light troops which are needed to secure some woods on the flank, so it needs a boost in a form of light infantry brigade from a nearby division. Or there is plenty of open space suitable for your heavy cavalry corps to smash the enemy line. Defining the organization of each group early as part of your plan will be essential. You need to consider the force mix appropriate for the terrain."
(RH) Again, be sure to always keep Command & Control in mind. Don't detach units from their commanders for anything other than a static defensive position. And watched the "Mixed Organization Penalty" when things heat up. It can be challenging, but if you don't stay on top of this aspect your forces will fall apart when you need them most. The methods to do this have been touched on in the first installment, and will be covered more in depth in the next, fourth installment.
6.7 Patience and persistence
The heart of success lies in the patient and persistent process of wearing down defenders by inducing disorder and routing among their ranks. The combined effect of these actions accumulates over time and reaches a pivotal point where the enemy's defense begins to crumble. Achieving this lies with skillful deployment and application of reserves, the effective reorganization of forces via maintaining C&C, and the rotation of tactical echelons.
Once a frontal assault is initiated, it has to be sustained without breaks. Send your divisions forward wave after wave. Most likely the enemy is outnumbered as you have the initiative so the battle of attrition works in your favor. The negative victory points (VPs) trade off due to losses can be set aside at this stage. The benefits, which may come later as the enemy's defensive line cracks, justify the “initial investment” required to penetrate the enemy line. As enemy units that become isolated in this process and end up eliminated, this will restore the balance of the initial drawbacks.
As echelons advance, artillery can be brought forward, cementing dominance in the area through firepower. If the enemy mounts a counterattack, the presence of artillery behind the first echelon serves as a deterrent against further costly attempts.
6.8 The Power of Diversionary Attacks
The core objective of a diversionary attack is to divert the enemy's attention and reserves, generating a dilemma for their headquarters. If an opportunity emerges to unsettle the enemy's equilibrium, it's usually a wise move to capitalize on it. This introduces an additional layer of decision-making for the enemy HQ, potentially leading to a miscalculation or oversights—another element to potentially overlook.
In all likelihood, the enemy will find themselves off-balance while responding to the diversionary attack: dispatch a division, and they might need a division to counter it. If the enemy chooses to react with a corps, you effectively draw their material reserves into the secondary sector. If they go for a brigade-level response they will likely be outmatched, with compromised command and control, and consequently causing another crisis in their battle line.
6.9 Timing
In most cases, the game won't run until the very last turn. One side's morale usually breaks before that happens and one of the opponents surrenders. If you're not aiming to be the one whose morale breaks, then time is on your side.
It's unusual for large scenarios to have number of turns as a constrain. This mostly comes into play in smaller rearguard actions where time is really tight. Hence, don't just charge at any enemy position you see simply because you can. Instead, focus on maneuvering to get an advantage. Take your time. Work on your overall battle plan and the strategy for a specific attack. Try to coordinate different attacks so they hit at the same time from both flanks.
This strategy might stress out the enemy's command and control; their top commander won't be able to manage all directions at once. Being able to reorganize and rotate disordered units is super important for successful defense. You also don't have to move every single unit every single turn, even if it feels strange not to. It's alright if some units stay put and wait for others to gather. For more tips on coordinating bigger operations in the game, check out the section on General Staff which will be covered in the next blog post.
6.10 Consider widening the frontage
Always consider the frontage of the operations on the offensive. Let’s take the example from the battle of Quatre Bras, scenario #203 from Waterloo title which uses an alternate deployment and some adjustment to OOB and PDT. For further details on the changes refer to: http://1815.deds.nl/

From the first glance the narrow front of the allied position behind the stream creates a perfect defensive line for in depth defense deployment with concentrated artillery fire and optimal C&C cover mitigating the weakness of allied command structure.
There are three French infantry divisions and one cavalry division facing one allied division:
- 9th ID on the left flank,
- 5th ID division on the right and
- 6th ID further to the rear approaching via the main road.
- 2nd CD in at the center
The French can throw their three divisions into the frontal assault but this is what every allied commander is hoping for, turning the battle into a costly meat grinder. If the allied commander plays it right and manages to hold out for 7-8 turns until British reinforcements begin to arrive and deploy in depth, it is extremely difficult for the French player to capture the crossroads considering the forces are roughly equal in size.
The alternative way to approach this battle by the French is to widen the front via the following battle plan:
1) 9th ID division is to be tasked with enveloping the allied right flank via Bossu woods and 2nd brigade is to push towards crossroads frontally while the 1st brigade is to deploy its skirmish regiments in the Bossu woods itself negating a few allied battalions in this area from joining the rest of the allied division.
2) 5th ID is to order its 1st brigade to march north-east and to secure the bridge across the stream opening a route of advance further north. The 2nd brigade is to cross the stream to the left of Materne Pond and to secure a bridgehead pushing further towards the main road.

Such French moves create a difficult dilemma for an allied player.
Firstly, the 2nd Dutch division is partially out of position through its original deployment as it was historically.
Secondly, even in case the allied player manages to concentrate behind the stream, the division would be thinly spread. There is ~22 hex frontage behind the stream to be defended. The 2nd Dutch division has only two brigades with its leaders’ command radius of 3.
From C&C perspective the optimal frontage 2nd Dutch can cover is 11 hexes (3 hexes 1st brig + 3 hexes 2nd brig + 5 hexes divisional leader radius). Any 2nd Dutch unit outside of 11 hexes frontage would be detached and out of command. Up until the British reinforcements arrival, the allied commander can effectively provide C&C cover to only 11 hex frontage, while the above-mentioned orders for the 5th and 9Th French divisions would increase the frontage of the battle line to ~35 hexes all of which is easily covered by the French C&C!
Hence, the French goal is to extend the frontage even further as much as possible utilizing its command radius superiority and attempting to overextend the allied formation causing its disintegration. The other benefit of such a maneuver for the French is shifting the effort to the fields north of Materne Pond which is more favorable to their superior cavalry.
Spreading two allied brigades over a wider front would prevent the Allied commander from deploying and building its defense in depth: with forward line, main resistance line and reserves behind. Accordingly, the French should have an easy time to achieving a breakthrough, disordering and isolating the thinly spread Allied battalions.
Finally, there is only one wagon per division available and ammo shortages will become another Allied problem very quickly.
Once 2nd Dutch division is dealt with, the French commander can proceed with a wider plan:
- Ordering 9th ID to envelope the crossroads from the left, either via the road and through the woods directly. This move would be widening the front further, disrupting Allied C&C and intercepting any British reserves moving towards the crossroads via the main road from the north-west.
- The 5th French ID can push further north keeping the crossroads to its left presenting the Allied HQ with a difficult dilemma where to dispatch the arriving British 5th ID under Lt-General Picton. Its either splitting this division into parts compromising its already weak C&C or to allow the French to envelope one of the allied flanks.
- The 6th ID is to assault the crossroads frontally with most of the artillery and with 2nd cavalry division in support to create pressure the allied position from the pike.

To summarize: always aim to stretch the front of the attack. The defending side has to cover all possible directions. The attacking side has the luxury of concentrating only in certain areas. Narrower front favors the defender due to artillery concentration and the ability to deploy in depth. Stretch them as much as you can.
6.11 Napoleon’s offensive art
Let's review the above-mentioned points through the prism of Napoleon's offensive strategy, using the Battle of Borodino as an illustrative example supplemented by PBEM after action analysis from Marengo Campaign WDS title. From the first glance Borodino battle may seem like a frontal clash between two armies, however there is a great deal of operational aspects to understand about this battle and it serves as an excellent case for study and analysis.
Napoleonic era battles most often hinged on major roads, crucial for supply and communication with the rear. Denying the enemy access to these routes meant cutting off their supply flow. The implications were significant: the enemy would either be compelled to surrender (as seen in the 1805 Ulm campaign), or they would have to resort to retreat using rural roads, as seen in Suvorov's Swiss campaign in 1799.
Retreating through minor roads often resulted in:
- Abandoning some or most of the baggage train and artillery, due to their restricted off-road capabilities. This essentially meant losing the main source of fire power and life-supporting system of the army, including ammunition, forage, food supply, etc. Abandoning a regimental train had a devastating impact. To get the perspective, consider yourself losing your backpack, your mobile and your wallet on a major multi-day hiking trip.
- Facing the risk of disintegration, as units tended to scatter and seek independent escape routes rather than waiting for the traffic jam to clear on narrow roads.
- Command-and-control challenges, as coordinating multiple units moving along various routes proved difficult for army staff officers.
- Facing the risk of losing the rearguard, which would be forced to hold off the advancing enemy for an extended period, allowing the main army more time to navigate the poor roads.
To fully understand the significance of communication lines in the context of Napoleonic warfare, consider playing the Austrian side in a PBEM game set during the Battle of Loano. Opt for the "Advance on Genoa" path of the full Marengo Campaign of 1800 to access the scenario.
On the map, there's a pike road situated at the rear of the Austrian left flank, running parallel to the sea coast. If the French manage to break through this pike road, they can effectively trap the Austrians, moving north swiftly using pike’s speed advantage, outpacing the Austrians. To make things worse for the Austrians, there is a creek (impassable) behind the Austrian army dividing the map in half, with two bridges providing critical chokepoints.

The above screenshot shows the situation as of Turn 10. The Austrians have abandoned the position described in the 'Defense in Depth' chapter and are now in full retreat. The majority of the army is crowded around the bottleneck at Bridge 1, attempting to cross the creek and retreat using the path leading north. The French are closing in in force. The allied player is under pressure.
The movement costs for the paths are standard, offering no speed advantage. However, the pike movement costs are reduced by half, presenting the French with an opportunity to potentially breach the Austrian position at Bridge 2 and move at double speed northward. This maneuver allows them to march in parallel to the main Austrian army at double speed, surpassing it, and subsequently outflanking it from multiple sides and/or trapping it in obstructed terrain. This prevents the Austrians from deploying their artillery and cavalry in combat.
In an effort to prevent this, one division on the Austrian left flank has formed the rearguard. Their orders are to hold Bridge 2 at Loano until the main army safely crosses Bridge 1 and breaks for the north, as indicated in the screenshot.
The French player decided to concentrate his efforts on pressing the main Austrian army at Bridge 1 rather than pushing through Bridge 2 at Loano with full force. The French artillery was around Bridge 2 was redeployed to the left to engage the main army, giving the Austrian rearguard at Loano some breathing space.
At Bridge 1, the disciplined Austrian grenadiers successfully held the French at bay just long enough for the main army to cross the creek at Bridge 1 and break away northward. The French commander then redirected their efforts to Bridge 2 at Loano. However, the momentum was lost and the Austrian rearguard managed to hold the crossing just long enough and giving up the bridge only when it was clear that the main army had safely moved northward.
Screenshot below showing the situation as of Turn 19. One division is moving north east. The main body is retreating north via the path in the center. The rearguard is still holding on to the Bridge 2 but has started retreating north via pike leaving some skirmishes to cover the escape.

Nonetheless, the retreat of the main body was chaotic, with only one path leading north. It became congested with traffic from artillery, cavalry, and wagons, leaving no room for infantry who had to move through obstructed terrain at slow speed. Consequently, one Austrian division had to use another road leading north-east and split from the main force. Some units got mixed up in the process, resulting in a partial loss of command and control. Effectively, by this time the Austrian army was divided into three parts, out of position, crammed in obstructed terrain being unable to deploy its cavalry and artillery, with some units were being detached and out of command. Organizing another defensive line anywhere on the map was out of the question.
The result is Major Victory for the French side. However, the Austrian army made it off map mostly intact to continue the campaign.
This scenario vividly illustrates the challenges a Napoleonic era army could face during a retreat through rural roads while being cut off from its primary line of operations. Handling the retreat of a 30,000-strong Austrian army was already a formidable task. Having a much larger force accompanied by hundreds artillery pieces, and attempting to retreat via similar terrain would be a complete disaster.
Back to Borodino now. In the context of the Borodino battle, the main road which was used by both armies through the entire 1812 Campaign was the so called New Smolensk road connecting Smolensk with Moscow. Borodino village sat on New Smolensk road (marked in red on the image below), which was the crucial communication route for Kutuzov’s army.
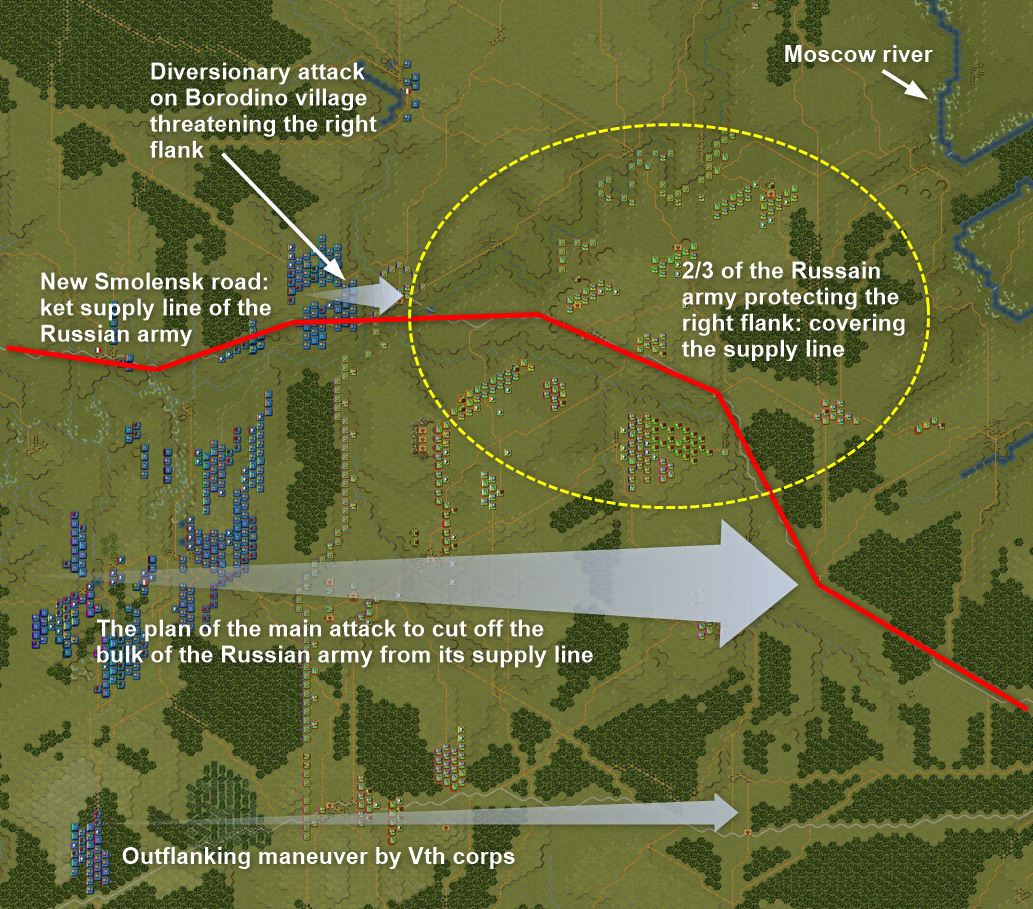
Kutuzov was deeply concerned about being cut off from the New Smolensk Road, as it would mean losing a vital operational line. In the event that the Russian army needed to retreat, as they did the following day, this main road was their only viable option. Other country roads in the area could not accommodate the movement of the army with hundreds of guns, along with tens of thousands of men, horses, and thousands of wagons. Furthermore, attempting to retreat in the northeastern direction, Kutuzov would find himself pressed against the impassable Moscow River with marshy banks and no bridges, facing a similar defeat to the Russian defeat at Friedland in 1807. Without access to the main road, Kutuzov would face a total disaster, as there were no alternative routes of retreat to the east.
In response, Kutuzov placed significant forces, about 2/3 of this army (highlighted in yellow) to his right flank on the both sides of the road to protect this critical route, in the same manner as Wellington dispatched 15,000 of his troops to Hal prior to Waterloo in 1815, to watch his line of retreat to the sea. These troops had no opportunity to assist Wellington’s army during the Battle of Waterloo and the Duke's decision to give up 15,000 of his troops just before the decisive battle demonstrates the level of concern Napoleonic era commanders had regarding their supply lines.
In the case of Borodino, Kutuzov lacked the knowledge regarding Napoleon's intended strike. While it may be apparent to us two centuries later, the Russian HQ did not possess such retrospective insight back in 1812. Hence, Kutuzov's initial deployment was aimed at securing the line of retreat to the rear, yet it also allowed for the flexibility to shift some forces from the right to the left within a few hours, should the need arise. And this is exactly what Russian HQ did during the battle as the risk of Napoleon attacking the Russian right flank gradually diminished as the day progressed.
Now having the background of the battle context and disposition, let’s examine how Napoleon approached this battle.
1. Napoleon frequently employed diversionary attacks to draw the enemy's attention and reserves. An example of this is the morning assault on the Borodino village.
Napoleon recognized Kutuzov's concern about his right flank and aimed to exploit it by launching a diversionary attack on Borodino village. The objective was to discourage Kutuzov from sending reinforcements from the right to the left flank, as in fact Napoleon's plan involved breaking through the Russian left flank and reaching the highway, effectively cutting of the Russian army from the main road. Consequently, forcing Kutuzov to retreat eastward via country roads probably loosing most of the artillery, wagons and overall control over the army.
Capturing Borodino also gave Napoleon a valuable artillery position, enabling fire to be directed enfilade at the Russian center. A French player in the Borodino scenario would typically use this position, mirroring history by capturing the village and placing heavy artillery from the IV Corps around Borodino.
Interestingly, Russian HQ returned the favor with a diversionary attack on the same day. A cavalry corps and Cossacks were ordered to raid the French left flank in the midst of the battle. Some scholars still debate whether this influenced Napoleon's decision to withhold using his Guard. Thus, this tactic can also be employed defensively.
2. Napoleon pioneered the concept of grand batteries, employing concentrated artillery fire to clear the way for his offensive echelons. At Borodino, he massed around 300-400 guns against the Russian left and the Raesvski redoubt position, skillfully creating enfilade fire zones and achieving local fire superiority.
The Russian response to this was poor, despite their numerical advantage over the French artillery and possessing some degree of technical edge in certain aspects, mainly due to the outstanding Licornes pieces (watch out for Licornes FP in WDS series!):
“First Army’s brilliant and foolishly brave artillery chief, the 28-year-old General Alexander Kutaisov, forgot his management duties of the army's reserve artillery and impulsively grabbed the flag at the head of one of the counter-attacking infantry battalions to charge into the [Raevski] redoubt. He never made it out. At the time, his loss was unknown to Barclay or anyone at HQ, so that artillery resupply and reinforcement from the reserve stopped for the rest of the day. Consequently, a third of the First Army’s artillery was never engaged and was absent when it was later needed most.” (Jeff Berry, Borodino, Obscure Battles).
This is a good example demonstrating superiority of Napoleon’s staff system over allied armies as late as 1812. The French modern like approach to General Staff system introduced standard procedures, well-defined command hierarchy and clearly designated second-in-command roles.
On the Russian side a notable instance of command chain failure occurred in the artillery reserve of the 1st Western army, where there was no designated second in command to replace Kutaisov. In general, the Russian army already had complex organizational structure of the 1st and 2nd Western armies united into one under Kutuzov’s HQ but each army retaining its own HQ and staff. This mess was further aggravated by general atmosphere of intrigues plaguing the Russian command chain. Orders were occasionally ignored or overruled by other HQs. Often it was down to ego battles between individuals of the Russian military nobility, which was also common in other allied armies.
The WDS Napoleonic series effectively captures the distinctions in the staff system between the Allied and French armies through command range values. Commanders in the French army possess a broader radius, enabling them to effectively command units over greater distances. Additionally, Napoleon's command rating of 'B' reflects not only his exceptional commanding abilities but also the efficiency of his staffing system.
3. Napoleon often executed envelopment maneuvers to outflank or to extend the enemy's defensive line. At Borodino, this maneuver was evident with the dispatch of the Polish Vth Corps to Utiza. This maneuver was limited to only one relatively small Corps (~10,000) due to various aspects like the poor condition of French cavalry, unreliable maps, and coordination/communication challenges due to the Cossacks dominating in the area.
This limited effort was matched by the Russian HQ but still succeeded in pulling an equivalent Russian force into the sector, thereby extending the front and placing added pressure on the defending side. As both forces where evenly matched Polish Vth Corps could capture Utiza village but could not move on to envelop the main Russian army as per Napoleon’s original orders.
4. Napoleon excelled at identifying weaknesses in the enemy's disposition. On the day of Borodino, Napoleon could see that while the Russians' right was strong and well-positioned, he correctly pinpointed the Russian left flank as the vulnerable spot and directed his main offensive effort there. The plan was to breakthrough it frontally with support of the Grand battery and reach the New Smolensk road in the Russian rear.
Breaking along the main roads and forcing the enemy to react is another concept WDS players can consider when planning their offensive operations. The supply concept is beyond the scope of the game. However, as demonstrated by Loano scenario example above, cutting off the enemy from their lines of retreat will most likely get the enemy moving out of their positions presenting you with an opportunity to catch the defender off balance.
5. Finally, once the primary effort's location was decided, Napoleon concentrated mass infantry, cavalry and artillery in a combined arms manner. Throughout the Battle of Borodino, approximately more than half of the Grand Armee were committed against the Russian left flank at various times, achieving and maintaining local numerical superiority for most of the day, which also explains higher Russian losses on that day.
The above offensive principles may sound straightforward, but as Carl von Clausewitz capably stated:
“Everything in war is very simple. But the simplest thing is difficult.”
In a real scenario, implementing all the above would be challenging. Things might not go as planned. Expect the unexpected. Schedules will fail, opponents will surprise you, and assaults will go badly. However, the beauty of being on the offensive lies in the ability to dictate the pace, timing, and the point of the main effort, compelling the enemy to react. You have control over several aspects, while your opponent doesn’t. Keep in mind the principles of Napoleon’s offensive art and enjoy having the initiative. Personally, a well-executed offensive plan is more satisfying than a successful defensive action.
----------------
And that my friends brings us to the end of this installment. We still have two more installments to go covering the topics of:
- General Staff
- Rearguard Actions
- Navigating the emotional challenges of PBEM
- Methods of play
As we said last time, if you are reading this and are really passionate about another series of our games - and would like to be involved in making something similar happen for them you can drop us a line at Helpdesk@wargameds.com to discuss further.
Until next time...


Very dear Alex and Rich:
I have read thoroughly, studied carefully, these five installments. I have learnt so much and enjoyed even more that I am deeply grateful to you both.
This work is impressive.
I dream in similar series of instalments regarding the other two series I’m fortunate to have: Musket and pike and First World War campaigns.
Eager to see these enhancements on staff work tools.
Thank so much for the incredible élan you have pushed to John Tiller’s heritage.
Hugs!
Loved all 3 articles, looking forward to the next two! Thank you so much!
@Chris, yes, we’re aware – Hans stopped updating his work several years ago which is why it has been moved to sub-folders within the game. It was added in a patch several years back, but WDS does not update it ourselves. If someone wishes to work with it then the files have been preserved. It was part of Alex’s article though, so didn’t want to chop it out!
Great article… a lot to digest! Just a note – Waterloo scenario #203 does not play under 4.07 (and possibly 06) – will not load and errors out.
Leave a comment